SeXBox Version 2 - Or how to create your own sex crazed zombie army
SexBox Version 2 for XBox
or
HOW TO MAKE YOUR VERY OWN SEX CRAZED ZOMBIE ARMY

Foreward
So, here we are again. As of me writing this, there have been 81222 views of the old SeXBox version 1 tutorial. We've gotten linked from the US to Hungary to Iceland to New Zealand. Yup, we're fuckin' popular.
Why a version 2?
The first version of this was horribly unsafe in so many ways it's not even funny. Bare connections, real batteries, and all sorts of other nastiness. It was funny, sure, but it wasn't good.
I'm always striving to make things more modular, too. That's why we're going with jacks this time instead of crazy mock power supply setups.
The main reason, however, lies in the 1000's of referers we've gone through because we're attention whores.
The reaction to v1 has been a little... unexpected. A good 60-70% of the forum threads on the SeXBox consist of posts that can be summed up with the following line:
"D00d, whi'z tha+ guy g0tt4 d1ld0! diz shitz for fagz n girl5, fuk dat!"
Yes. That's right, SeXBox v1 could only be used if you wanted a dildo either in your vagina or up your butt. Not like it could've been used for anything else. Nope, you're stuck with dicks. Too bad if you're a straight male.
But oh, wait. We seem to have forgotten about that little invention that all these lonely guys probably don't want to admit to owning!
The pocket pussy!
For those of you unfamiliar, which is apparently most of the internet...

This is a pocket pussy. The term "pocket" is rather loosely used, due to the fact you'd need an awful big pocket for this one.
For those of you who are going to ask (shit, it happened last time...), it's the Magic Flesh ToyBox pocket pussy by Nasswalk. Since I don't feel like supporting any certain store that doesn't pay me to, just google the bolded terms, you'll have no problem finding it.
"How is it used?," you ask?
Well, here's a diagram, using the famous blue vibrator from our first post.
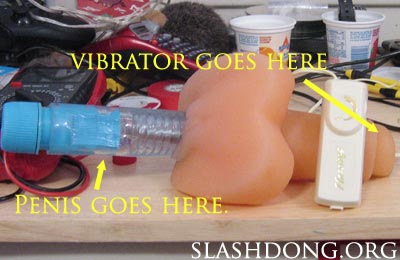
See? Cock goes in one end, vibrator in the other, and together they make a happy pair!
For those of you that actually just learned something from the last section, please skip on to the What You Need section.
So obviously, I'm dealing with an internet full of idiots here. I'm sure I sound like I mind, but I don't.
Why? Because I've got an army to train, and now, I've got the tools to do it.
Everyone has heard of LAN parties. Quite a few people spend their weekends at them. Hell, the wacky foreigners of Europe have arena sized ones with thousands of people.
Thousands of people all playing games where they are rewarded for taking over territory and killing each other.
Now usually these rewards are in the form of points or rankings. But what if they were in the form of sexual gratification?
The more you kill, the longer the vibrator stays on. The more territory you acquire, the faster it goes. The more lines you get, nothing happens, 'cause wars aren't fought with Tetris.
I could... No... I WILL have an army of lethal, sex-obsessed killing machines after 2 rounds of Counter Strike.
I'll send them into whatever country I want to invade and watch them jizz themselves stupid while innocents are massacred.
I WILL REIGN SUPREME.
Think I'm kidding?

This is a picture of the new Slashdong Tactical Training Center, at a location so undisclosed that I'm not even sure where it is. Attached to every computer is the secret PC version of the SeXBox Controller (which will be not so secret in a few weeks). Rows and rows of future sex-slave zombie soldiers, playing the game of their choice, waiting for my command.
All thanks to the SeXBox.
Crazed Sex Zombie Army Idea - Copyright 2004, 2005, Infinity*2 - qDot - Steal it and I'll send my army after you. And don't give me that "you're repeating the plot of a bazillion animes" shit either. MINE!
[/obligatory plot explanation by evil genius.]
So, anyways, on with OPERATION JIZZBOX... I mean, the tutorial!
Disclaimer and Safety
Update 2013-05-25: Wow. I used to be a seriously scared kid. This section used to contain lots of "OMFG YOU COULD DIE DOING THIS" warnings and asks not to copy. Well, those days are long gone. See the CC license on the footer? Yeah. That.
This is going to void the warrenty on pretty much everything you work on. I know how much fun returning used sex toys is, but you won't be able to do it after this, since you're running it off a non-standard power supply. You're also drilling holes in the Xbox controller. Stores don't usually take things back that have holes that wern't there when you bought them. Measure 439783298 times, drill once, or forever live with a swiss cheese controller.
We take ABSOLUTELY NO RESPONSIBILITY for your stupid ass fucking up and/or dying. You're hooking homemade electronics to something that's gonna be near your no-no zone. The stupidity in this is obvious. So don't come to us if you hurt yourself, we hate the smell of singed pubes.
Materials
A Note About Eggs
As you can see, one of the required ingredients for this project is some sort of vibrator that uses a 3/32" connector. These are very, very common. Any Dildo Warehouse should have all sorts of toys that use this setup. You can usually tell on the box whether or not the egg is going to be modular.
Be warned, egg quality can vary GREATLY depending on price (this isn't necessarily a bad thing, as we'll explain later). If you buy a $7.99 egg/controller setup, don't expect earth shattering vibration out of it. One of the better eggs we've found comes with the iVibe iEgg setup, but that's a $50 investment (well worth it if you're interested in playing with basic variable level motor control circuits though).
Disassembly and Preparation
First off, you're gonna need to take apart your controller.
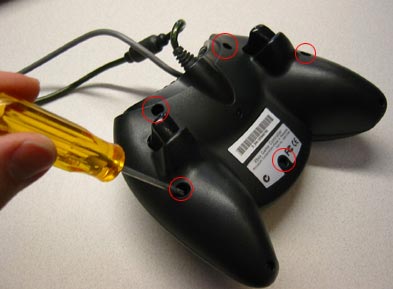
Image totally ripped off of the TechTV tutorial. Note that this is a regular Xbox controller on the picture. If you're using an S-Controller, the screws will be in a slightly different place. If you can't figure out where, stop now, and go get a grown up.
First off, let's take part the XBox Controller. Remove the 6 screws in the back, set the controller down on it's back, and remove the top plate. Put all of the buttons and pads to the side for the time being, but don't lose them, otherwise you'll have a gimpy controller. No one wants a gimpy controller.
Now, assuming you can, disconnect the two vibration motors from the bottom of the board. There's a right way and a wrong way to do this.
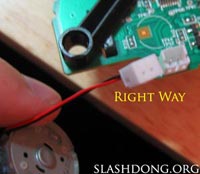
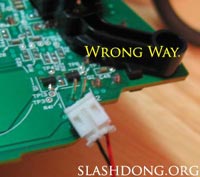
In the right way, you gently remove the motor from the 2 pin connector on the controller circuit board, leaving the connector intact.
In the wrong way, you rip the connector off its pins, destroying it and leaving two pins on the board to remove later. However, don't feel bad. It is the fault of the motor for being so stubborn, and Microsoft, for making the Xbox in the first place.
Your controller should now be pretty much a bare board with a couple of trigger buttons and a cord attached to it. Set it aside, and get the back side of the controller.
Grinding and Drilling
Let's take a look at the back of the controller.

As the picture says, we're going to want to grind the two plastic cylinders down until they are smooth. These cylinders are usually used to support the circuit board, since those points are being pressed by the digital and right analog sticks. You're already breaking your board in the eyes of your warrenty though, so what's two less controller livetime saving features.
When grinding down the plastic, remember to wear your goggles and a dust mask. It's gonna smell fuckin' horrible (You are burning plastic, after all), and you really don't want this shit flying into your eyes or sinuses.
To grind these, I used a Dremel Multipro with cutting wheel to take the tops off, then a metal sanding wheel to get them down smooth.
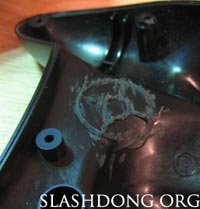
Assuming you do things right, they should look like this afterward.
Now, it's time to drill your holes. Your going to want the diameter of the holes to be just wide enough to snuggly fit the rim of the 3/32" jack.
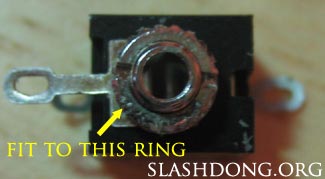
I recommend using a drill bit slightly smaller than the diameter, then using some sort of sanding method to open the hole wide enough.
I do not recommend using a very small drill bit from your fiancee's tool kit to drill the hole, then using the same bit to sand and sand until the hole is wide enough. This dulls the bit and make your significant other angry at you.
Here's a diagram of where you want the holes.
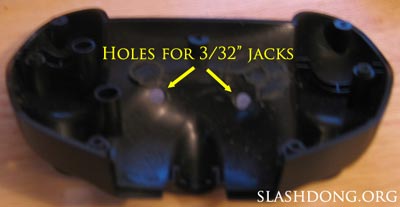
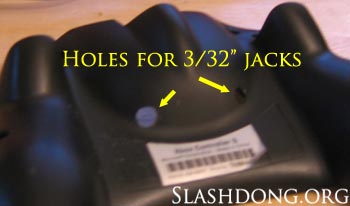
There's a tiny bit of leway in where you place the holes. Using my placement, there's a good chance your hand will be up against the connectors in the jacks while holding the controller. If you think that might bother you, you might want to experiment with placement.
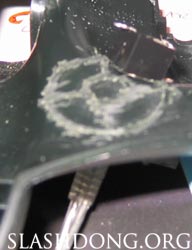
When you are done, I recommend putting a jack on the inside, connecting a plug into it, and then putting the controller back together. Make sure the jack doesn't come in contact with the board, and that it doesn't cause the board to sit improperly.
So, if you have things done correctly, it should look a little like this.
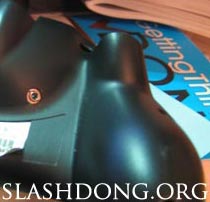

Connecting the Wires and a short Explanation of Force Feedback
Fire up the soldering iron, it's time to make some connections.
You're gonna be soldering to 8 different points here (4 on the controller, 2 on 2 jacks). I used 28 AWG wire, which is probably a little small for this job. I'd recommend 20-24 AWG.
If you plan on using something other than simple motors in these jacks, then for the love of god, have some sort of polarity standard. Otherwise, you get to deal with the damage running the current backwards causes.
First off, let's solder the jack side. Pretty easy, just connect one wire to each side of the jack.
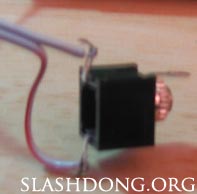
Now, we need to solder our wires to the controller board. Below is the diagram of the pads you need to solder to.
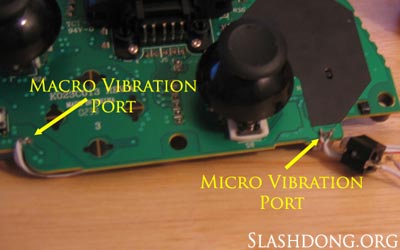
Solder the other ends of the wires to these pads. Now it's time to mount the jacks in the controller.
A quick aside
If you read our first tutorial, you might notice that we're using both pads this time. We didn't really do all that much (read: any) research the first time around. It was a rush to get this out the door so our 15 minutes of fame could start quickly.
There are two motors in the controller for a reason. They provide varying levels of vibration. The one of the left provides hard, burst vibration, while the one on the right produces more muted, long term vibration.
The best example I can find of this is grinds in the Tony Hawk series. When you first hit the grind, the macro motor bursts on for a second to simulate initial contact, then the micro motor takes over to provide the friction simulation of grinding.
Interesting, no? You'll probably want to experiment with how different games use these motors.
Back to the tutorial.
Mounting the Jacks
Now that you've got everything soldered together, it's time to mount the jacks into the controller. First, you're going to want to cover your connection points on your jacks, so they don't short something in the controller and cause things to catch fire. I'm assuming if you're smart enough to use heat shrink tubing, you've already got the tubes on the wires BEFORE you soldered. If not, welcome to ghetto land.
Get some small pieces of electrical tape, and wrap them around your connections, so that no bare wire is showing.
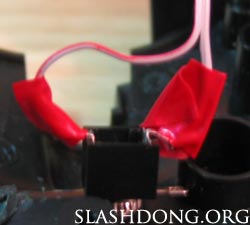
Now mount both jacks into the holes, but DO NOT GLUE THEM YET.
Initial Test
Instead, we'll be repeating the test from the hole drilling step.

Connect whatever you've got to the jacks (this makes sure they stay in the holes for the moment), put the controller back together, take it out to your Xbox, and boot up a game that has a vibration on/off option in the settings (I used Tony Hawk Underground 2 for this). Use this to make sure both of your ports work.
If your ports do not work: Uh.
If your ports do work, congratulations, you've got yourself a SeXBox v2!
Reassembly
Take everything apart again. You'll now want to apply some adhesive to make sure the jacks stay in, so you can plug and unplug from them whatever you'd like.
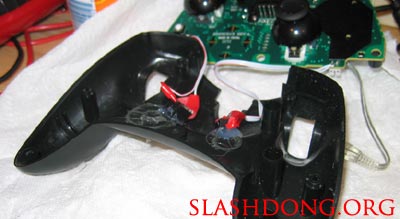
We used low temp hot glue for this. Hot glue is recommended due to the fact that the process can be easily reversed. Super glue and epoxy are also ok, but your controller may have jacks in it permanently with those.
For the final rebuild, we recommend just leaving the vibration motors out for the moment. If the motors are connected in parallel, there's a good chance you could burn out the driver in the XBox, which could be very difficult to replace. We'll be adding a switch mod soon that will allow you to use either the vibration motor or the jacks.
Other than that, put everything back together, and enjoy!
Labeling Techniques
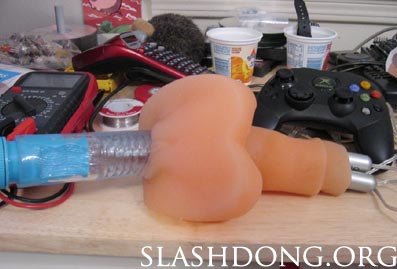
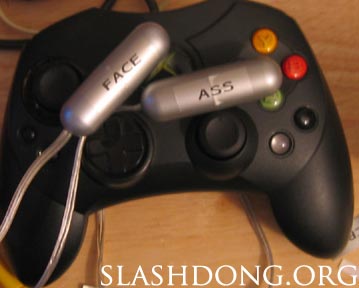
During testing, we found that not all vibrator eggs are alike. Some are awesome and will shake right out of your hand. Some you can't feel no matter where you put them. These balanced when used on the macro and micro ports, respectively. We decided to label ours for this.
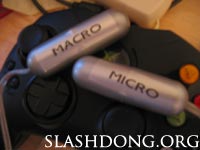
However, other labeling ideas came about. Since this mod can be used by couples, we decided we might as well steal an idea from towel manufacturers.

Then we realized that most people are most likely going to be using this solo, so we stole an idea from the smart towel manufacturers.
Would ya like to buy a monkey? How about a SeXBox controller?
Update 2013-05-25: Well we're never selling them so oh well.
What's Next
All that's really left for this project (other than the usual porting to other consoles) is to add switches to move between vibration motors and the external jack hookups. We'll hopefully have this posted in a couple of weeks.

