SeXBox Vibration Controller

Pictures thanks to
LouderThanGod
PS1/2 VERSION ALSO AVAILABLE - CLICK HERE
For everyone that wanted to know what vibe that is in the picture,
click here for the forum thread with all the info on it

VERSION 2 NOW AVAILABLE
We recommend using the version 2 setup if you actually plan on
building this. However, please feel free to read on, as this article
is fucking hilarious.
What you'll need
- Xbox controller
- Soldering Iron
- Wire
- A vibrator
- However many AA batteries the vibrator takes
- Electrical tape
Mod Difficulty: Good god, this is so stupidly easily.
Intro
Here at /8====>, we've already combined two things essential to live -
strip clubs and food. Now it's time to put sex and video games
together in a pair we like to call The SeXBox. The second you start
playing with this while on XBox Live, it turns into teledildonics!
This mod didn't take any engineering. There's nothing new or amazing
that we're doing with this, hell, we really didn't even think of the
method first. However, we DID involve sex, so we win!
(Ok, so we come in 2nd to
Girl Game Advance's use of the Rez Trancevibrator.
But it's a close second! Except for the fact that they have a picture
of like, a REAL girl, and we're stuck with pictures of dildos,
multimeters, and MAN HANDS.)
Basically, what you're going to be doing is hijacking the 5VDC line
that goes to the large vibration motor on the left-hand side of your
XBox controller (this is assuming your XBox controller is facing up).
Using this line, you can do a ton of stuff that involves needing power
that's triggered by a game. Here's a couple of examples:
Like I said, this isn't original. Even so, no one has hooked it up to
a sex toy... UNTIL NOW.
So right now, you're probably saying to yourself "qDot, you said the
motor runs off a 5 VDC line? My vibrator only takes 1 or 2 AA
batteries! Isn't that too much power?"
Yes, yes it is. In a later tutorial (when I actually have the parts,
and yes, I realize I'm just missing resistors, but Radio Shack is a
whole block away and I've got a new toy to play with!), we'll be
showing how to do a current reduction so that you don't burn out the
motors in your toys quite so quickly. However, for now, this is more
of a proof of concept deal. We won't stop you from setting this up,
but be warned, you're shipping a ton of current to a motor that
probably wasn't made for it, so expect quicker burnout.
Also, note that this is going to void the warrenty on everything you
work on. I know how much fun returning used sex toys is, but you won't
be able to do it after this, since you're running it off a
non-standard power supply.
Finally, we take no responsibility for your stupid ass fucking up
and/or dying. You're hooking homemade electronics to something that's
gonna be near your no-no zone. The stupidity in this is obvious. So
don't come to us if you hurt yourself, we hate the smell of singed
pubes.
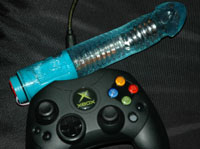
Also, don't just pick any toy. This is the future. This is special. I
went to The Dildo Store and bought this toy specifically for this
tutorial. Why? What made it call out to me from the shelves?
It HAS LEDs IN IT! Really! It has little Red and Green LEDs that
light up when you turn it on! Blinky blinky! IT'S A RAVE IN A DILDO!
uNF
Er.... so... yeah....
With that being said, ON TO THE TUTORIAL!
Putting it together
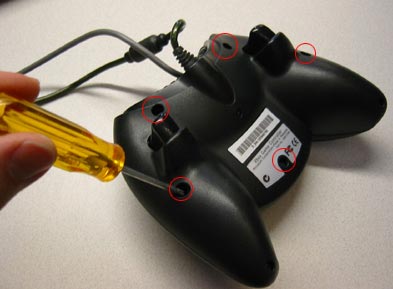
Above image totally ripped off of the TechTV tutorial. Note that this
is a regular Xbox controller on the picture. If you're using an
S-Controller, the screws will be in a slightly different place. If you
can't figure out where, stop now, and go get a grown up.
First off, let's take part the XBox Controller. Remove the 6 screws in
the back, set the controller down on it's back, and remove the top
plate. Put all of the buttons and pads to the side for the time being,
but don't lose them, otherwise you'll have a gimpy controller. No one
wants a gimpy controller.
Now, assuming you can, disconnect the two vibration motors from the
bottom of the board. If you can't get one of the motors off, that's ok
(the big motor on the S-Controllers can be a real bitch), You'll just
need to be extra careful when soldering.
Your controller should now be pretty much a bare board with a couple
of trigger buttons and a cord attached to it. Time to solder!
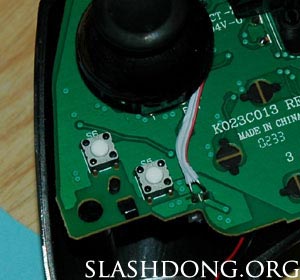
This is a really easy 2 point soldering job. Simply solder two wires
onto the pins for the large vibration motor connector. Make SURE to
mark which wire is which (positive/negative wise). Polarity issues are
the last thing you want to deal with, as they tend to produce lots of
magic smoke.
Once the wire is connected, seat the board back into the controller,
and figure out how you're going to run the wire out of the controller.
There's a few ways to do this.
- Run the wire through a hole where the save card goes
- Assuming you use save cards a bunch, dremel a small part of the
connecting edge of the controller out, and run the wire through that
hole.
Now there's the question of whether or not you want to hook up the
vibration motor again or not. If you do, the two motors will be
connected in parallel. If you've got a VERY low power thing that
you're hooking up on the other end, this is probably ok. However, put
anything requiring decent amount pf power and you'll probably bake
something. If you don't hook the vibration motor line back up, the tap
line will get the full current.
The other solution is to unsolder the vibration motor connector
completely, and hook the motors in series. Each motor will get 2.5v,
which means you'll be fine for your vibrator, but the vibration motor
might be a little slow (Though it does still run at 2.5V @ 100-200mA).
Update (Thanks to Oscar G): A good idea for any of these setups
would be to wire a 200-300mA fuse in front of the power tap. Sure,
there's gonna be plastic and whatever else between you and the
direct voltage, but things tend to get a little... wet and messy
down there, and if the current jumps, you don't want something that
looks like the head of an electrified cartoon character in your
crotch.
Put the controller back together, and you're done installing the power
tap. Easy, wasn't it?
To get this working in your vibrator, you're going to need to get the
exposed wires on the outside connected to the battery leads somehow. I
have a rather ghetto method for doing this.
I'm going to assume you've got a vibrator that takes 2 AA batteries,
side by side, in a series connection. Get your electrical tape, and
use a single, non-overlapping strip to tape the batteries together
side by side (If the tape overlaps, it might make the width of the
two-battery-package too large to actually fit in the vibe.). Then tape
the batteries lengthwise, so that all the contacts are covered by the
electrical tape. Finally, tape the correct ends of your exposed wire
over the contacts. You've now created a make-shift battery that will
run off the tapped power from the controller.
UPDATE (Thanks to R B for this): FOR THE LOVE OF GOD MAKE SURE YOU
COMPLETELY COVER THE BATTERY CONTACTS WITH TAPE. Even better,
don't use batteries at all. Find something battery shaped that will
work. I know said to do it above, but it's absolutely, ridiculously
important to make sure that NO part of the battery ends are exposed
through the tape. If a wire running current comes in contact with
the exposed battery, you run the risk of have a battery explode,
which is definitely not something anyone should ever have to deal
with (just ask any below average EE student for their experience).
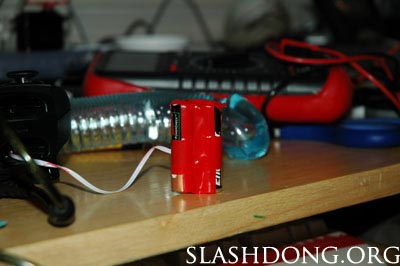
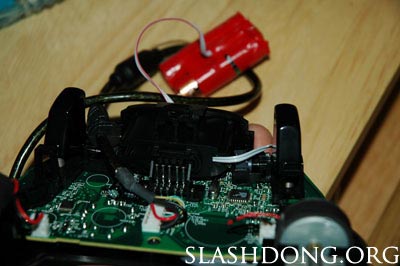
Here's what the whole package looks like.

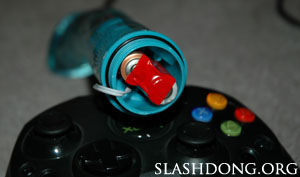
This is what the top looks like. Note the ghetto as shit job I did on
aligning the wires. That's pure fuckin' American laziness at work
right there. Not like you people have anything to say about it, I
don't see any of YOU spending your free time hooking dildos up to
power sockets, eh?
This idea can be used for one battery systems, too. Just wrap the
contacts in electrical tape, then tape the exposed wires on the
corresponding ends of the battery. There's a question of the width of
battery+wire not working, and since it's going to be a motor rated
near 1.5v it's gonna burn out really quick, but it's doable.
Put the battery pack in whatever you planned on putting it in, boot up
your favorite game, and go into the options menu to test the vibration
function. Assuming you hooked up everything correctly, you should now
have a force feedback sex toy!
Time for our first test of the vibrator (with no one attached to the
other end, unfortunatly. We really gotta work on the whole porn aspect
of this site). In dedication to
JG Ballard
(and to a lesser extend,
David Cronenberg), I decided
to use Burnout 3 in Crash mode. There's nothing quite as satisfying as
watching a dildo run due to the fact that you just crashed your car
into a crowded intersection. Sure enough, the second I hit another
car, the vibe took off across the table. It was truly a beautiful
sight, and one I'll hopefully have a movie of here pretty soon.
The Future
- Make the wire longer (yeah, 8 inches of wire is most definitely not
enough), and put on some flavor of connector.
- Current regulation so that things don't burn out so quick. This is
just a matter of me not being so damn lazy.
- I'd really like to tap through a cord extension and run the force
feedback as a function of the controller input signal, rather than
going straight out of the power line in the controller. However,
doing this on an XBox controller could be an absolute bitch (I
figure there's just 5V coming off the USB port, and there's some
circuitry in the controller either creating PWM or else regulating
some aspect of the currect.). That way, you wouldn't have to crack
open a controller, and you could even use RF or IR signals for
wireless force relay.
- I need to try this on PS2 and Gamecube controllers. I have both,
it's just a matter of opening them up (or else just finding a
picture of them) and finding the lines. Once I do this, I'll post
pictures. I'm sure the instructions will be almost exactly the same.